Crochet Worm on a String
- By Josephine Stockton
- 07 Jun, 2020

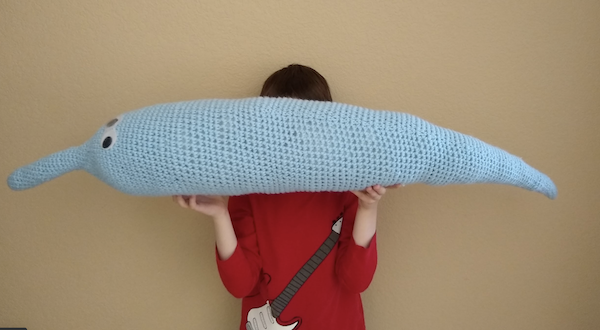
Invented in 1977, the worm on a string has been a favorite childhood toy for over 43 years. In the past, I have crocheted a rubber chicken and other funny gimmicks like kline bottles, so when I came across one of my old worm on a string toys, I knew I had to make a gigantic crocheted version.
In this free pattern, you will learn how to make your own 42”-52” worm on a string amigurumi toy. Although somewhat time-consuming (but very worth it), this pattern uses very simple stitches such as the single crochet, the single crochet increase, and the single crochet decrease.
Supplies:
- Hook: 5.00mm (Size I/5.25mm)
- Yarn: Size 4 worsted weight (body color, can be variegated)
- *If you use a larger size yarn, use an appropriate hook and your worm will be gigantic! :)
- Googly Eyes: 30 or 40 mm
- Polyester Stuffing
- Yarn Needle
- Stitch Marker
- Hot Glue or Fabric Glue or Super Glue
- You will need scissors
Abbreviations/Stitches Used:
- MC - Magic Circle
- SC - Single Crochet
- INC - Increase
- SC2TOG - Single Crochet Decrease
- CH - Chain
- st - stitch
- sts - stitches
- slst - slip stitch
- FO - Finish Off
Pattern Notes:
This pattern will be worked in continuous rounds.
Use a stitch marker to keep track of which round you are on.
Each worm will be one-of-a-kind.
Assembly instructions can be found at the end of the pattern.
Have Fun!
Step 1: Tips
If you prefer, use a K/6.50mm crochet hook and bulky size 5 yarn (or 2 strands of worsted size 4 yarn) to make a HUGE worm! This was how I made the blue worm, which is 52” long instead of only 42” long.
There are 3 ways to attach the googly eyes.
Find googly eyes meant for sewing, they will have a plastic loop on the back, and they can be sewn on after the worm is done.
Hot glue or super glue a safety eye that’s been sanded flat to the googly eye back and place it between rows 35 and 36 so that the edges touch and the decrease from rows 68-177 is in the middle of the two eyes down the back.
Using regular googly eyes, use super glue or fabric glue to attach them to the worm body.
Stuff only when the worm gets close to where you can no longer reach, it becomes increasingly difficult to crochet the worm as it becomes longer and fuller of stuffing. If the worm is flat it can be moved around easier.
Step 2: Begin:
Start from nose tip:
Round 1: Start 6 SC in a MC [6]
Round 2: INC in each st around [12]
Round 3-23: SC in each st around [12]
Round 24: (INC, SC in next 3 sts) 3x [15]
Round 25: (INC, SC in next 4 sts) 3x [18]
Round 26: SC in next 3 sts (INC, sc in next 5 sts) 2x, INC, sc in next 2 sts [21]
Round 27: SC in next 4 sts (INC, sc in next 6 sts) 2x, INC, sc in next 2 sts [24]
Round 28: (INC, SC in next 7 sts) 3x [27]
Round 29: (INC, SC in next 8 sts) 3x [30]
Round 30: SC in next 5 sts (INC, sc in next 9 sts) 2x, INC, sc in next 4 sts [33]
Round 31: SC in next 6 sts (INC, sc in next 10 sts) 2x, INC, sc in next 4 sts [36]
Round 32: (INC, SC in next 11 sts) 3x [39]
Round 33: (INC, SC in next 12 sts) 3x [42]
Round 34: SC in next 7 sts (INC, sc in next 13 sts) 2x, INC, sc in next 6 sts [45]
Round 35: SC in next 8 sts (INC, sc in next 14 sts) 2x, INC, sc in next 6 sts [48]
Round 36: (INC, SC in next 15 sts) 3x [51]
Round 37: (INC, SC in next 16 sts) 3x [54]
Stuff the nose tip moderately
Round 38-67: SC in each st around [54]
Stuff the head moderately
Round 68: SC2TOG, SC in the next 52 sts [53]
Round 69: SC in each st around [53]
Round 70: SC2TOG, SC in the next 51 sts [52]
Round 71: SC in each st around [52]
Round 72: SC2TOG, SC in the next 50 sts [51]
Round 73: SC in each st around [51]
Round 74: SC2TOG, SC in the next 49 sts [50]
Round 75: SC in each st around [50]
Round 76: SC2TOG, SC in the next 48 sts [49]
Round 77: SC in each st around [49]
Round 78: SC2TOG, SC in the next 47 sts [48]
Round 79: SC in each st around [48]
Stuff the body moderately
Round 80: SC2TOG, SC in the next 46 sts [47]
Round 81: SC in each st around [47]
Round 82: SC2TOG, SC in the next 45 sts [46]
Round 83: SC in each st around [46]
Round 84: SC2TOG, SC in the next 44 sts [45]
Round 85: SC in each st around [45]
Round 86: SC2TOG, SC in the next 43 sts [44]
Round 87: SC in each st around [44]
Round 88: SC2TOG, SC in the next 42 sts [43]
Round 89: SC in each st around [43]
Round 90: SC2TOG, SC in the next 41 sts [42]
Round 91: SC in each st around [42]
Stuff the body moderately
Round 92: SC2TOG, SC in the next 40 sts [41]
Round 93: SC in each st around [41]
Round 94: SC2TOG, SC in the next 39 sts [40]
‘Round 95: SC in each st around [40]
Round 96: SC2TOG, SC in the next 38 sts [39]
Round 97: SC in each st around [39]
Round 98: SC2TOG, SC in the next 37 sts [38]
Round 99: SC in each st around [38]
Round 100: SC2TOG, SC in the next 36 sts [37]
Round 101: SC in each st around [37]
Round 102: SC2TOG, SC in the next 35 sts [36]
Round 103: SC in each st around [36]
Stuff the tail part finished so far, moderately
Round 104: SC2TOG, SC in the next 34 sts [35]
Round 105: SC in each st around [35]
Round 106: SC2TOG, SC in the next 33 sts [34]
Round 107: SC in each st around [34]
Round 108: SC2TOG, SC in the next 32 sts [33]
Round 109: SC in each st around [33]
Round 110: SC2TOG, SC in the next 31 sts [32]
Round 111: SC in each st around [32]
Round 112: SC2TOG, SC in the next 30 sts [31]
Round 113: SC in each st around [31]
Round 114: SC2TOG, SC in the next 29 sts [30]
Round 115: SC in each st around [30]
Stuff the tail part finished so far, moderately
Round 116: SC2TOG, SC in the next 28 sts [29]
Round 117: SC in each st around [29]
Round 118: SC2TOG, SC in the next 27 sts [28]
Round 119: SC in each st around [28]
Round 120: SC2TOG, SC in the next 26 sts [27]
Round 121: SC in each st around [27]
Round 122: SC2TOG, SC in the next 25 sts [26]
Round 123: SC in each st around [26]
Round 124: SC2TOG, SC in the next 24 sts [25]
Round 125: SC in each st around [25]
Round 126: SC2TOG, SC in the next 23 sts [24]
Round 127: SC in each st around [24]
Stuff the tail part finished so far, moderately
Round 128: SC2TOG, SC in the next 22 sts [23]
Round 129: SC in each st around [23]
Round 130: SC2TOG, SC in the next 21 sts [22]
Round 131: SC in each st around [22]
Round 132: SC2TOG, SC in the next 20 sts [21]
Round 133: SC in each st around [21]
Round 134: SC2TOG, SC in the next 19 sts [20]
Round 135: SC in each st around [20]
Round 136: SC2TOG, SC in the next 18 sts [19]
Round 137: SC in each st around [19]
Round 138: SC2TOG, SC in the next 17 sts [18]
Round 139: SC in each st around [18]
Stuff the tail part finished so far, moderately
Round 140: SC2TOG, SC in the next 16 sts [17]
Round 141: SC in each st around [17]
Round 142: SC2TOG, SC in the next 15 sts [16]
Round 143: SC in each st around [16]
Round 144: SC2TOG, SC in the next 14 sts [15]
Round 145: SC in each st around [15]
Round 146: SC2TOG, SC in the next 13 sts [14]
Round 147: SC in each st around [14]
Round 148: SC2TOG, SC in the next 12 sts [13]
Round 149: SC in each st around [13]
Round 150: SC2TOG, SC in the next 11 sts [12]
Round 151: SC in each st around [12]
Stuff the tail part finished so far, moderately
Round 152: SC2TOG, SC in the next 10 sts [11]
Round 153: SC in each st around [11]
Round 154: SC2TOG, SC in the next 9 sts [10]
Round 155: SC in each st around [10]
Round 156: SC2TOG, SC in the next 8 sts [9]
Round 157: SC in each st around [9]
Round 158: SC2TOG, SC in the next 7 sts [8]
Round 159: SC in each st around [8]
Stuff the tail part finished so far, moderately
Round 160: SC2TOG, SC in the next 6 sts [7]
Round 161: SC in each st around [7]
Round 162: SC2TOG, SC in the next 5 sts [6]
Round 163: SC in each st around [6]
Finish stuffing the tail moderately
FO, sew the hole closed and hide the end using a yarn needle.
Step 3: Assembly and Finishing
Place the googly eyes using one of the 3 methods explained above.
CONGRATS! You now have your very own crocheted giant worm on a string. Feel free to send me pictures, I’d love to see!

